6 minutes
Website setup part 1 - Configure S3 for static website hosting
The Cloud4Engineers blog was created because I wanted to prepare for the AWS Certified solutions architect - professional certification. The exam for this certification is one of the most difficult in IT, which is why you hardly have a chance to pass it with blunt memorization (apart from the dubious added value of such an approach). So I was looking for a way to gain hands-on experience with AWS. The development of this blog was ideally suited as such a project, as a large number of AWS services are used here. See here what other steps I took to pass the exam in first attempt. I also had the idea of a blog in my head for a long time. So I could kill two birds with one stone.
In the course of the implementation, I noticed that I always found what I was looking for on individual topics on the Internet, but I couldn’t find a blog or tutorial anywhere that really describes the entire process. So I had to put a whole concept together from a bunch of individual pieces of information. I would like to spare my readers this, which is why in the course of this article, I will try to describe all the components used together with their configurations.
Architecture
After some thoughts, I came up with the following architecture/workflow, which I initially implemented by hand:
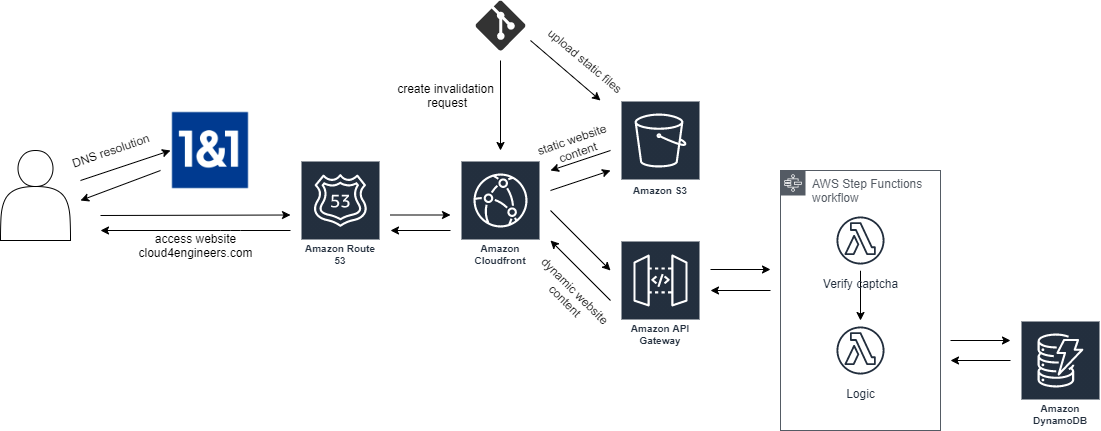
Explanation:
The heart of the blog is an S3 bucket that has been configured for static website hosting. Since I already had my own domain, I wanted to deliver my website via https under this domain. I use CloudFront for this because S3 does not support static website hosting in conjunction with SSL. In addition, CloudFront significantly accelerates the delivery of the website. Route53 should take care of the DNS resolution. Static website hosting eliminates the need for server-side programming languages. Dynamic components such as the comment function or the contact form are possible through the use of ApiGateway in conjunction with Lambda functions. Since I also integrated a Captcha query in each case, but didn’t want to copy the code into every Lambda function, I decided to use step functions. The captcha is always checked first and then a lambda function with the actual logic is called. I use DynamoDB as the database.
The question now arises: How does the content get into the S3 bucket? I use Hugo for this. Hugo is a templating engine with which finished html pages can be generated from markdown files. Together with so-called themes, a static website can be created without much effort. For the generation of the html files and the subsequent upload into the S3 bucket, I use a github repository with a github actions workflow. So I can roll out my page fully automated.
The main steps to complete the blog are:
Configure S3 for static website hosting
The first step is to configure S3 for static website hosting as this is the central part of the above described architecture. This is also a prerequisite for creating the github actions workflow, as this requires the bucket as the upload target. Let´s get started!
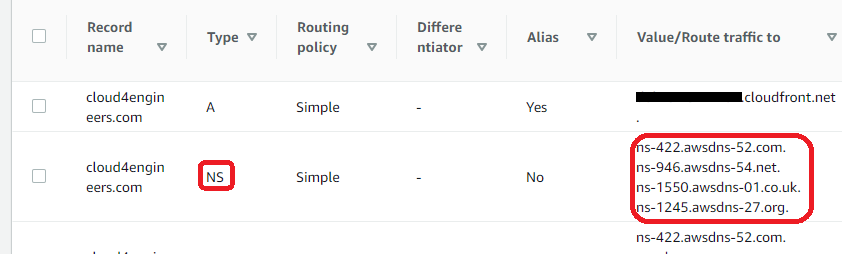
First things first: Create the required buckets In order to serve content from cloud4engineers.com as well as from www. your domain, you need to create 2 buckets. The www bucket simply redirects traffic to the other bucket and does not contain any files. Amazons documentation on how to achieve that is quite good, so please follow the steps described in the AWS article to create the buckets and configure them properly (Steps 2-10). At the end of these steps, you will create a hosted zone along with some records. Make a note of the NS records being created as you will need them later.
As you may have observed, I skipped steps 1 and 11. This is because I do not use route53 as a domain registrar. I use 1&1 a german registrar where I bought the domain back then. Configuring this provider to serve content from S3 will be covered a bit later.
If you do want to use route53, then also follow the instructions of step 1.
Create or import an SSL certificate (optional)
In order to SSL encrypt the communication, you´ll have to create an SSL certificate. This can either be done via an external service such as Let´s encrypt or directly in AWS. If you go with the latter approach you have to import that certificate into the AWS Certificate Manager. If you want to create the certificate directly within AWS, follow these steps.
Configure CloudFront to serve content from S3
We have static website hosting now, woohoo! BUT there is a problem: Static hosting on S3 does not let you serve SSL encrypted websites. SSL encryption nowadays is the standard way of serving web content (for good reasons) and you should also do this. To circumvent this issue, you can use CloudFront. CloudFront also brings some more benefits to your page such as faster loading times due to caching or more fine-grained access control.
To set up CloudFront, follow the steps described here. To enable SSL communication, make sure check the Redirect HTTP to HTTPS option. Also note that the default root object usually is index.html.
After you´ve done this, your website content should be shipped via CloudFront in an SSL encrypted way. There´s one drawback you have to get rid of, tough: The S3 website content is still directly reachable. This is bad in scenarios where you want to control access to your website with CloudFront (maybe in conjunction with WAF). There are multiple possibilities to circumvent this issue. They are described in this well-written blog post. I chose the simple version.
After this has been set up, proceed with registrar configuration.
Note: If you use a different domain registrar than 1&1 follow these steps to serve content from AWS through your domain and skip the next section.
Configure 1&1 (IONOS) registrar
To let a 1&1 registered domain serve content from AWS, you have to login to the 1&1 customer portal. Once there, choose the domain you want to adapt. 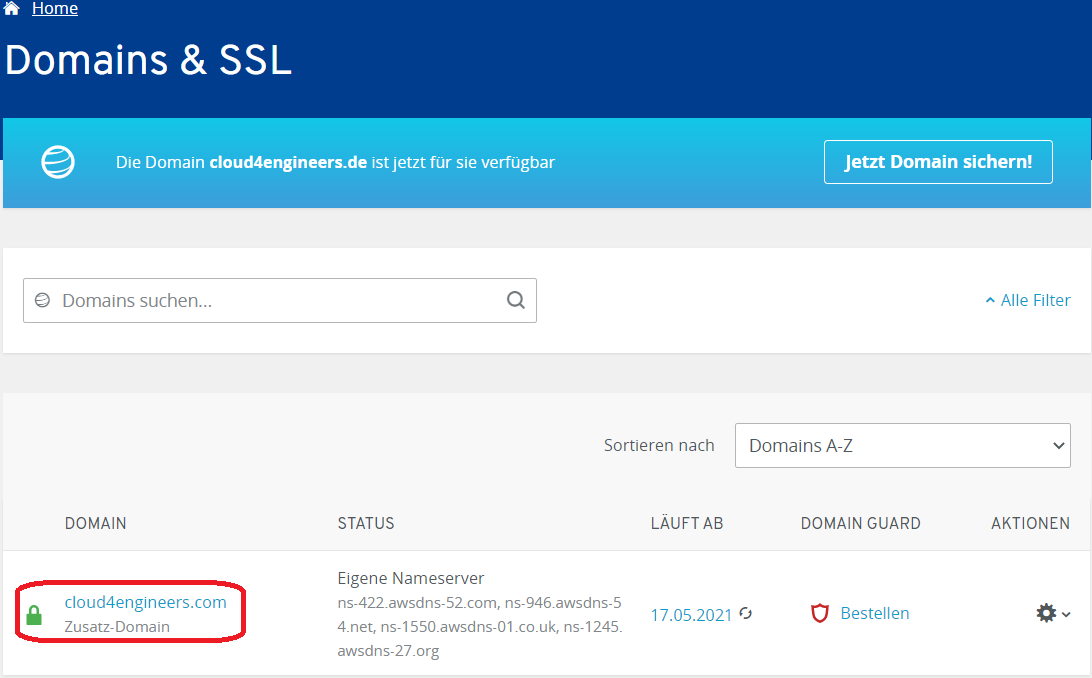
On the next page choose the tab Nameserver and click Edit nameserver. 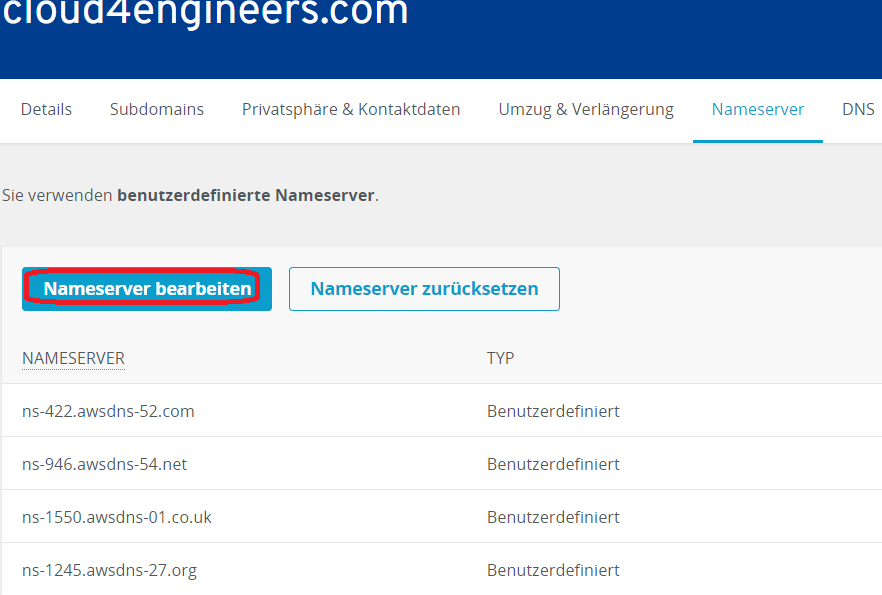
Put the four nameserver values you have obtained earlier into the boxes and hit Save. 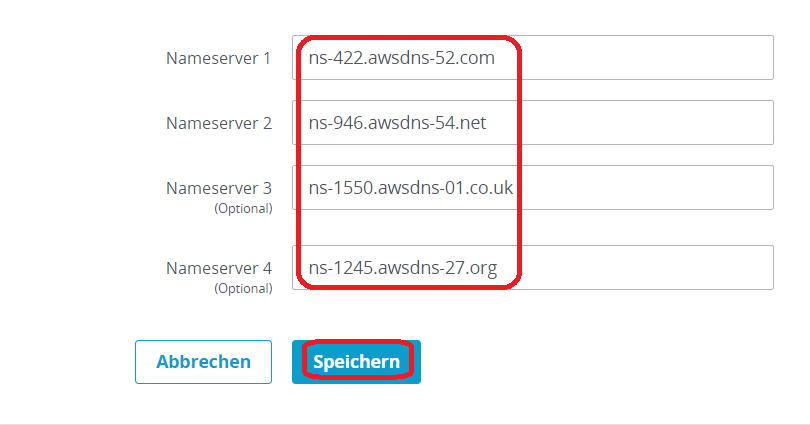
That´s it! Wait for the DNS propagation to do its work (this can take up to 24h).
Summary
After following these steps, you should have:
- Two S3 buckets - one configured for website hosting and one configured for redirecting requests to the previous one.
- CloudFront serving files from the S3 bucket at edge locations using SSL encryption
- An SSL certificate in the AWS Certificate Manager
- A Route53 hosted zone and records to serve the CloudFront distribution from your custom URL
- Changed your registrars Nameserver entries to point to your route 53 hosted zone
That was a lot of work and (in my opinion) the hardest part of setting up static website hosting from your custom domain properly. Now you can head over to the more-fun part and bring some magic to your github repository. See you in the second part of this article series.
aws architecture cloudformation serverless apigateway stepfunctions route53 1&1
1229 Words
2020-10-27 08:36
Comments