11 minutes
Website setup part 3 - dynamic content
In the previous part, you have created a github actions workflow to automatically upload generated hugo content to your S3 bucket. Now it´s time to add the possibility to interact with the website. In my case, the below described approach is used by the contact form as well as by the comment function of the articles here. I will describe the flow to create the resources for the comments section. The workflow for the contact form works analogous to this.
Let´s have a look at the architecture diagram again to understand, what we have to do:
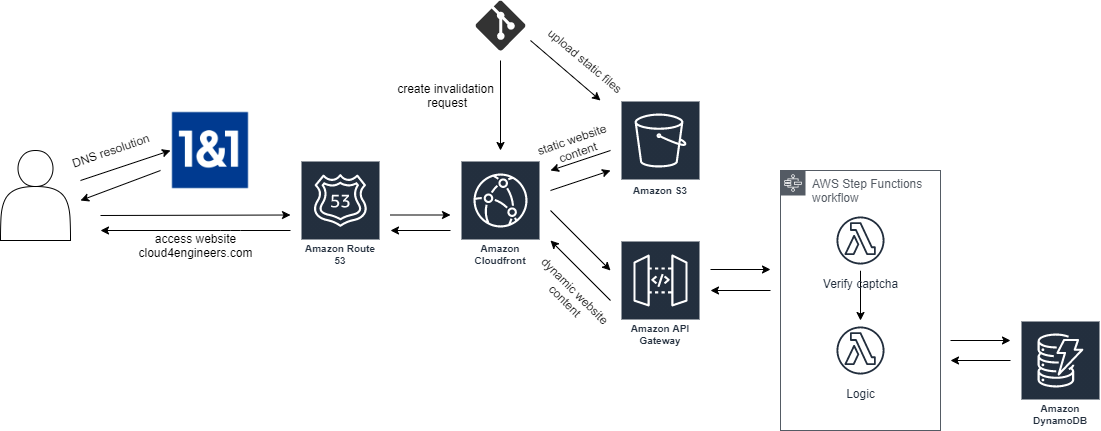
As you can see in the image, dynamic content creation is handled by a combination of API Gateway, Lambda Functions (one for verifying the captcha, one for the actual logic) and DynamoDB to store the data. To orchestrate lambda function execution, I also make use of step functions. Because we have some dependencies here, let´s start by providing resources in reverse order. Let us start by creating the DynamoDB table.
Create DynamoDB table
In the AWS console, switch to the DynamoDB service and click on Create Table. Specify the following attributes and click Create:
- Table name: c4e-comments
- Partition key: articleId (String)
- Check Add sort key
- Sort key: timestamp (Number)
- Uncheck Use default settings
- Read/Write capacity mode: Provisioned
- Uncheck Auto Scaling for Read and Write capacity (to reduce costs)
- Read capacity units: 1
- Write capacity units: 1
- For the rest you can leave the default
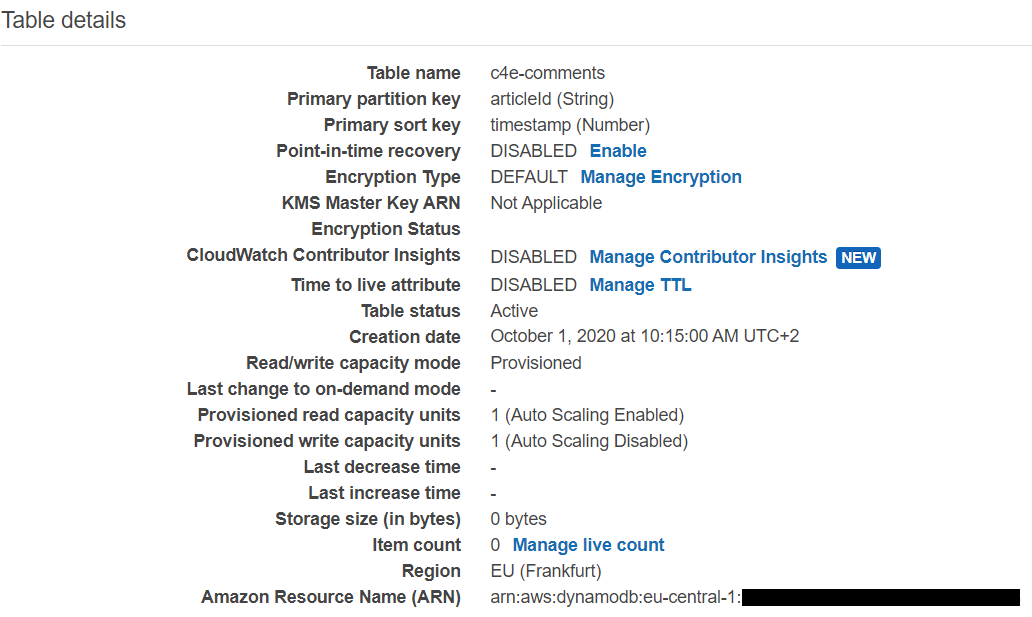
The table details should now look similar to that from the screenshot:
Now that we have our table in place, we can go ahead and create our lambda functions. One function verifies the Recaptcha whereas the other is able to put items into our brand new DynamoDB table.
Create lambda function to put items into DynamoDB table
In the AWS Console, switch to the Lambda Service and click Create Function. Choose Author From Scratch and provide the following details:
- Function name: Choose a name (e.g. c4e-dynamodb-putitem)
- Runtime: NodeJs 12.x
- Execution Role: Create a new role with basic Lambda permissions
- Advanced settings: Leave the defaults
After creation, you can put the following code into the online editor and hit Save
exports.handler = async (event) => {
    var AWS = require('aws-sdk');
    var data= event.body.data;
    var status=event.body.statusCode;
    const maxLength=350;
    const tableName="c4e-comments"

    const responseOk = {
        statusCode: 200,
        body: JSON.stringify('Ok!'),
    };

    const responseFailure={
        statusCode: 400,
        body: data
    };

            //first, check if previous captcha varification was successful
  if (status != 200) {
    return responseFailure;
  }

    var strippedMessage=data.message.replace(/(<([^>]+)>)/gi, "");

    if(strippedMessage.length>maxLength){
      return responseFailure;
    }

    var message=strippedMessage.replace(/(?:\r\n|\r|\n)/g, '<br>');
    var articleId=data.articleId;
    var nickname=data.nickname;


    var ddb = new AWS.DynamoDB({apiVersion: '2012-08-10'});
    var params = {
          TableName: tableName,
          Item: {
            'timestamp' : {N: ""+Date.now()},
            'articleId' : {S: articleId},
            'message':  {S: message},
            'nickname': {S: nickname }
          }
        };


console.log("putting item:");
console.log(params);
// Call DynamoDB to add the item to the table
try{
  var result = await ddb.putItem(params).promise();
  console.log(result);
}catch(err){
  console.log(err);
  return responseFailure;
}

    return responseOk;
};
Ok, let us inspect above function. The basic idea is to receive an event from another lambda function. This is achieved by using step functions. At first, the event´s status field is checked. If this is not equal to 200, the function responds with a 400 HTTP status code and terminates. If it is 200, the function continues by putting an item into the created DynamoDB table. The values also come from the received event. After successful put, the function returns a 200 HTTP status code and terminates.
We now have a function which can put items into our DynamoDB table. But, it has no permissions to do so. Let´s change the execution role to allow this.
Change the IAM role to allow putting items in DynamoDB
In the AWS console, switch to the IAM service and click Roles. Choose the role which got created during our function creation and click Attach Policies. Now click on Create policy, switch to JSON tab and paste the following code (replace the placeholders with your values):
{
    "Version": "2012-10-17",
    "Statement": [
        {
            "Sid": "VisualEditor0",
            "Effect": "Allow",
            "Action": "dynamodb:PutItem",
            "Resource": "arn:aws:dynamodb:eu-central-1:<your-account-id>:table/<your-table-name>"
        }
    ]
}
After that, click on Review Policy, give it a name and click Create policy. Attach that new policy to your role.
Create lambda function to verify Recaptcha
We now have to create our second lambda function which will verify the Recaptcha and respond with an event we can use in the other function. Follow the steps above to create another NodeJS-based lambda function. This time we gonna call it c4e-recaptcha-verify. As function code use the following:
const request = require('request');
const secret = process.env.RECAPTCHA_SECRET

exports.handler = async (event) => {

    return new Promise(function (resolve, reject) {
        try {
            var eventBody = event.body;
            console.log(`Event body: ${eventBody}`)
            var verificationUrl = "https://www.google.com/recaptcha/api/siteverify?secret=" + secret + "&response=" + eventBody.token;
            request.post(verificationUrl, function (err, res, body) {
                let json = JSON.parse(body);
                console.log(json);
                var retVal = undefined;

                if (json.success) {
                    retVal = generateResponse(200, "Ok!", eventBody)
                } else {
                    retVal = generateResponse(500, "Error verifying captcha", json)
                }
                resolve(retVal);
            });
        } catch (err) {
            reject(err)
        }
    });
};


function generateResponse(status, message, data) {
    return {
        statusCode: status,
        data: data,
        message: message,
    }
}
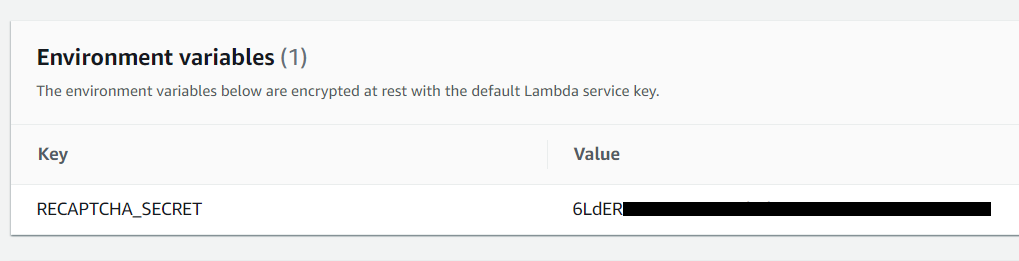
The function is straightforward: It makes use of an environment variable RECAPTCHA_SECRET and basically sends out a POST request along with the user-provided token to google in order to verify the captcha. The function returns an object containing information if the captcha has been verified successfully.
Scroll down to Environment variables section and provide the required environment variable as shown in the image below.
If not done already, you can create a Recaptcha Secret here.
Let´s put the pieces togehter: Create a step function definition
Ok, let us summarize what we have done so far and how we want to proceed:
- We have created a DynamoDB table to store comments
- We have created a lambda function which can create items and put it into that table
- We have created a second lambda function to evaluate Recaptcha
The next step is to create a step function in order to tie those pieces together. In the AWS console, switch to the step functions service and click on Create State machine on the right side. You can leave the default settings. As definition, provide the following (replace the placeholders with your functions arn):
{
  "Comment": "A Hello World example of the Amazon States Language using Pass states",
  "StartAt": "VerifyCaptcha",
  "States": {
    "VerifyCaptcha": {
      "Type": "Task",
      "Resource": "arn:aws:states:::lambda:invoke",
      "Parameters": {
        "FunctionName": "<your-function-arn>",
        "Payload": {
          "body.$": "$"
        }
      },
      "Next": "CommentHandler"
    },
    "CommentHandler": {
      "Type": "Task",
      "Resource": "arn:aws:states:::lambda:invoke",
      "Parameters": {
        "FunctionName": "<your-function-arn>",
        "Payload": {
          "body.$": "$.Payload"
        }
      },
      "End": true
    }
  }
}
Now click Next. On the next page, specify the following parameters:
- State machine name: c4e-commenthandler
- Execution role: Create new role
- Log Level: OFF
Click on Create State Machine.
Create the REST API
We´re coming closer to the end now. We now have an orchestrator for our two lambda functions created earlier (step function) and a working database table. Let´s create our API.
Before we can do that, we have to create 2 roles: One role grants permissions to APIGateway to execute the step function created earlier. The other role grants APIGateway to get items from our DynamoDB table.
In the AWS console, switch to IAM and click on Roles. Click on Create role and choose APIGateway. Then click on Next: Permissions at the bottom. Click on Next: Tags and then on Next: Review. Give your new role a name (e.g. apigateway-to-dynamodb) and click on Create role. Now click on Attach Policies, click on Create policy, switch to JSON tab and paste the following code:
{
    "Version": "2012-10-17",
    "Statement": [
        {
            "Sid": "VisualEditor0",
            "Effect": "Allow",
            "Action": [
                "dynamodb:BatchGetItem",
                "dynamodb:ConditionCheckItem",
                "dynamodb:DescribeTable",
                "dynamodb:GetItem",
                "dynamodb:Scan",
                "dynamodb:Query",
                "dynamodb:DescribeTableReplicaAutoScaling"
            ],
            "Resource": [
                "arn:aws:dynamodb:eu-central-1:<your-account>:table/<your-table>",
                "arn:aws:dynamodb:eu-cental-1:<your-account>:table/<your-table>/index/*"
            ]
        },
        {
            "Sid": "VisualEditor1",
            "Effect": "Allow",
            "Action": "dynamodb:ListTables",
            "Resource": "*"
        }
    ]
}
After that, click on Review Policy, give it a name and click Create policy
Now we have to create the second role. This role will grant APIGateway access to execute the commenthandler state machine (step function). Follow the same steps as above, but use this JSON for the policy (again, reaplce the placeholders with your values):
{
    "Version": "2012-10-17",
    "Statement": [
        {
            "Sid": "VisualEditor0",
            "Effect": "Allow",
            "Action": [
                "states:DescribeStateMachine",
                "states:DescribeExecution",
                "states:ListExecutions",
                "states:StartExecution",
                "states:StartSyncExecution"
            ],
            "Resource": [
                "arn:aws:states:eu-central-1:<your-account>:execution:<your-function>:*",
                "arn:aws:states:eu-central-1:<your-account>:stateMachine:<your-function>"
            ]
        },
        {
            "Sid": "VisualEditor1",
            "Effect": "Allow",
            "Action": "states:ListStateMachines",
            "Resource": "*"
        }
    ]
}
Make a note of both role ARNs as we will need them in the next step.
In the AWS console, switch to the APIGateway service and click Create API. Choose REST API and click Build. Specify an API name, choose Edge optimized as Endpoint Type and click Create API.
On the resulting page, click on Actions -> Create Resource. Give this resource the name comment and specify the following path: /comment/{articleId}. Choose Actions -> Create Method and create a POST and a GET method. It should look similar to the image below:
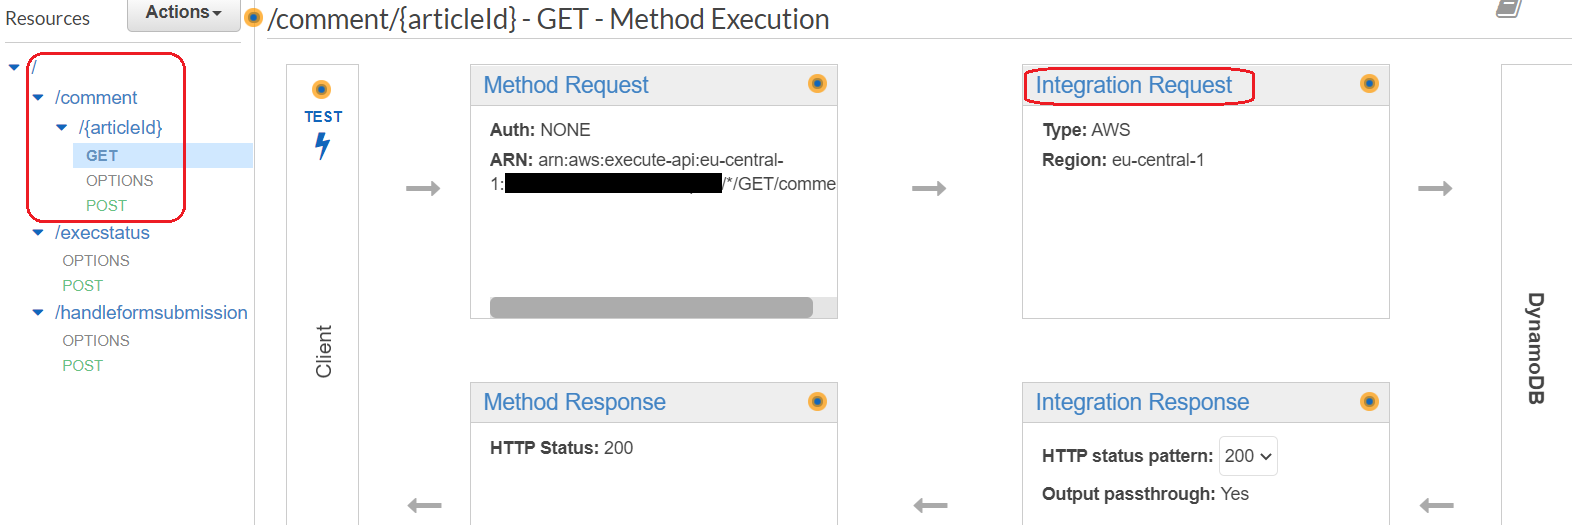
Select the GET method and select Integration Request. Specify the following parameters:
- Integration type: AWS Service
- AWS Region: choose your region
- AWS Service: DynamoDB
- HTTP Method: POST
- Action: Query
- Execution role: Role ARN of the role which grants access to DynamoDB
Now scroll down to create a mapping template. Click Add mapping template. Type application/json and as template, copy the following into the textarea:
{
  "TableName": "c4e-comments",
  "KeyConditionExpression": "articleId = :a",
  "ScanIndexForward":false,
  "ExpressionAttributeValues": {
        ":a": {"S": "$input.params('articleId')"}
  }
}
Now click Save.
What does this do?
This tells APIGateway to transform the parameter articleId into a putitem expression which DynamoDB understands.
Go back to the GET Methods main view and choose Integration Response. Click on Add integration response and specify the following:
- HTTP status regex: 200
- Method response status: 200
Here, we also have to create a Mapping template. Use the following as content:
#set($inputRoot = $input.path('$'))
{
    "comments": [
        #foreach($elem in $inputRoot.Items) {
            "articleId": "$elem.articleId.S",
            "nickname": "$elem.nickname.S",
            "timestamp": "$elem.timestamp.N",
            "message": "$elem.message.S"
        }#if($foreach.hasNext),#end
 #end
    ]
}
What does this do?
This basically tells APIGateway to iterate over returned DynamoDB items and create a JSON representation out of that. All the items are then part of an array called comments.
Back on the main view, choose Method Response, click on Add response and specify 200 as HTTP status.
Pheeew… that was a lot. Take a break before we continue with the POST method.
…
…
Now that we have create the GET method, we also need to create the POST method in order to allow users posting comments. This is done similar to the GET request method. Specify the following parameters for the Integration Request:
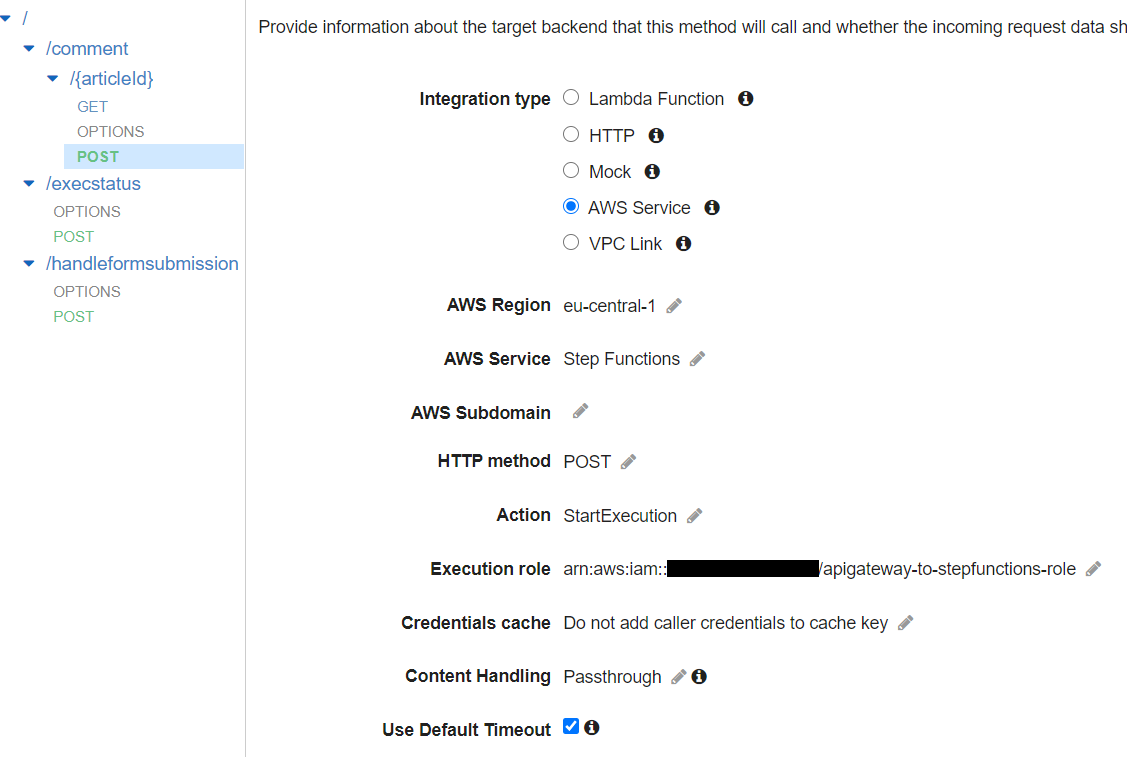
Also create a mapping template which should look like that (replace the placeholder with your account id):
{
    "input": "$util.escapeJavaScript($input.json('$'))",
    "stateMachineArn": "arn:aws:states:eu-central-1:<your-account-id>:stateMachine:c4e-commenthandler"
}
What does that do?
This receives the json-formatted values and stores that json object in the variable input which is expected by the step function. The other line lets AWS know, which state machine to execute.
Similar to the GET method, we also need an integration response. For the HTTP status 200, create a mapping template with the following content:
#set ($a=$input.json('$.executionArn').split(':')[6].replace('"', ""))
#set ($b=$input.json('$.executionArn').split(':')[7].replace('"', ""))
{
  "token": "$a:$b"
}
What does that do?
This basically removes all the information except the executionId from the resulting response and stores that executionId in the token variable.
Deploy the API
Ok. Now we need to make the API accessible from our website. Therefore, we have to enable CORS. Click on the /{articleId} resource, then choose Actions -> Enable CORS. Enable CORS for the Methods POST, GET, OPTIONS and leave the defaults for all the other parameters. Then click on Enable CORS and replace existing CORS headers.
Caution: This enable CORS for all hosts which means that any website out there will be able to perform this POST. You have to restrict that once you´re done with your setup.
Now it´s time to test what we´ve created. In the resource tree, click on POST. In the opening pane, you can see a button called Test. Provide a value for the {articleId} field. Then provide the following for the field Request Body:
{
  "articleId":"testid",
  "nickname":"test",
  "message":"test",
  "token":"mytesttoken"
}
This test will trigger the step function. Back in the step function service, you should be able to see that the function has been triggered. As we did not provide a valid Recaptcha token, the first lambda function won´t pass and the second one does not get executed. To have a working test, you need to either create a valid Recaptcha token and send it along with the POST request, or you modify the lambda function which is responsible for verifying the captcha to pass.
Once you have items in your table, you should also be able to test the GET method. Providing an existing articleId should give you all items belonging to that article.
You hopefully have a working API now. This API has not yet been published. This is what we do in this step. Choose Actions -> Deploy API. You can either choose an existing stage or create a new one. I recommend to set up throttling on this stage to reduce the risk of high costs for a small page like this. For me the following values seemed to be enough so far:
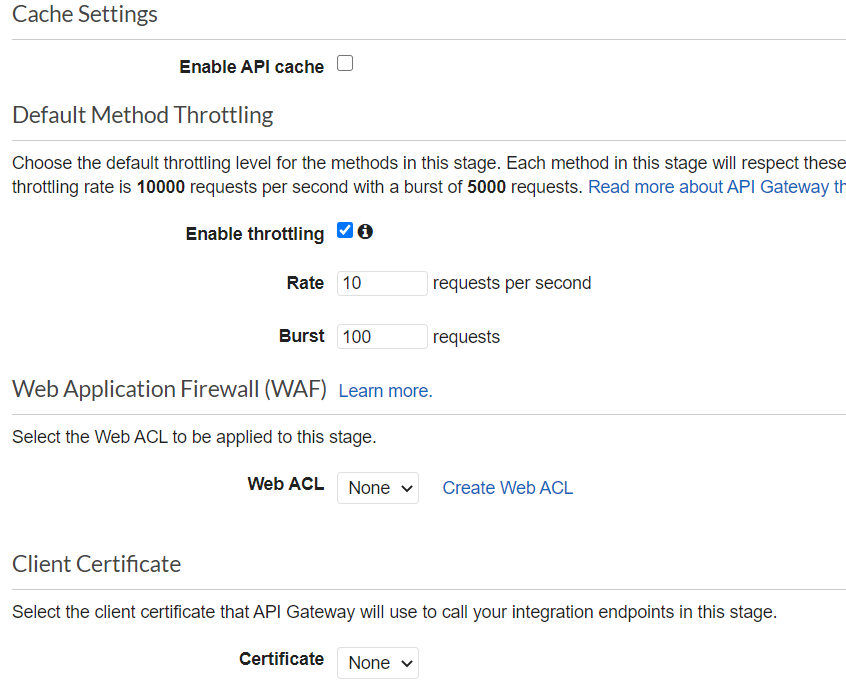
The creation of the stage created also a public DNS name for that API. That´s the one you can use from within your webpage. If you want to use your own, follow the next step.
Create a custom Domain Name for the API
On the left panel, choose Custom Domain Names and choose Create. On the appearing page, provide a valid domain name (e.g. forms.foo.bar) and choose Edge-optimized for endpoint configuration. Choose your ACM Certificate and continue by clicking on Create domain name. Once that is done, switch to the API Mappings tab and click on Configure API mappings. Here, click on Add new mapping, choose your API, stage and click Save.
Now you are able to call your API by using the custom domain name.
aws architecture iam acm nodejs serverless lambda apigateway stepfunctions
2325 Words
2020-11-08 08:36
Comments